Navigation in road rallies and trials
This introductory guide has been put together with the aim of encouraging you to go out and enjoy two of the most interesting and challenging forms of motor sport – road rallies and trials.
Road rallies and trials will sharpen your skills in observation, planning, logic and decision making while at the same time providing an enjoyable time with a friend or partner that can quickly become an adventure.
It is not a step-by-step or 'how to' manual and you will soon learn that for every answer that could be given for any given scenario there will be a devious director or organiser who can think up another way to obfuscate the information given. That is a very enjoyable and challenging part of the mind game between the director and competitor!
Some of this may seem daunting at first but you will find that your fellow competitors will advise and assist if you approach them with a genuine concern. Above all, remember that you are not competing for sheep stations so go about it with the intention of enjoying the challenge of the event in safety.
I make no claim to be the world's (or even my club's) best navigator and the information provided here is a combination of experience in motor sport, flying, sailing and outback travel together with advice kindly provided by several experienced navigators both here in Australia and overseas.
If anyone has a better answer to anything in this guide please tell us so that the guide can be updated and we can all learn. Discuss it on the Navigation in road rallies and trials forum thread.
This guide was first compiled in 2009 by Art Clarke.
Copyright 2009 Arthur Clarke.
What is a road rally or trial?
In short, a road rally is an event intended primarily to test the skill of the crew and the reliability of the vehicle consisting mainly of road sections and transport sections and a trial is an event intended primarily to test the navigation skills of the crew, consisting of transport sections, navigation sections, average speed sections and/or road sections.
Both event types are designed to be run on open public roads, in compliance with all road laws and regulations, in a normal road car that need not undergo any special preparation beyond the usual road worthiness requirements.
Both a full description and the relevant regulations pertaining to these events are available in the on-line manual available through the CAMS site under 'National Rally Code' and 'Touring Road Event Regulations'.
Clubs and licences
All potential competitors are advised to join a CAMS affiliated club which has road rallying as a predominant part or all of its core aims. There are a number of such clubs in South Australia. Take your time to attend a meeting of and talk to members in each club that interests you.
Why would you join a club? The clubs (usually a few dedicated members) provide the event organisation and operation that you need in order to be able to compete, together with the support and knowledge of the members.
You will need to join a CAMS affiliated club in order to purchase a CAMS licence of at least Level 2NS (NS for Non-Speed events).
Why would you pay for a CAMS licence?
Probably of most immediate interest and concern for you is that the CAMS Licence together with the Event Permit issued to the Event Organiser bring with them a basic emergency medical evacuation insurance cover.
Equally important is that the third party insurance which is part of the car registration fee may not be applicable when the car is used in any form of motor sport event and the CAMS licence fee is part of the financial structure which provides an alternate insurance cover for you.
A full description of what CAMS does is available on-line at http://www.cams.com.au/ and is well worth browsing.
Check with either the officers of your chosen club or with the local CAMS office about the regional requirements for participation.
Other licences
CAMS is not the only insurance facilitator so be aware that an organiser may have a suitable cover arranged with an alternate source such as AASA in which case you may need to have a licence from the alternate provider.
Role of the navigator
These are the elements mastered by the best navigators:
- Management and Tactics
- Timekeeping
- Paperwork
- Route plotting or clue solving
- Road reading
- Giving directions
- Keeping your place on the map and in the road book.
Don't worry too much about these things now, a lot of it is addressed below and you will find that many club members will gladly advise and assist you when needed if you just ask.
Safety in the car
You will find this addressed throughout this guide for which I make no apology.
If you ever have the opportunity to see a slow motion replay of in-car footage from a car going through a high speed multiple rollover you will understand why as items as innocuous as pencils can become lethal missiles.
On road rallies and trials the danger is considerably lower as all the road laws must be complied with but that is no reason for complacency or poor planning just as it is not in day-to-day driving
Secure everything you reasonably can.
Stow equipment in it's place immediately it is no longer required.
Watch the driver if you need to make repairs etc and ensure he does the same.
Working environment and equipment
Don't be fooled into thinking that you HAVE to have all of these at hand or fitted into the car. Road rallies have been won by crews using nothing more than a good hand held torch, a school ruler and a pencil. That's really doing it the hard way but it CAN be done.
Basic tools
Odometer or specialised tripmeter
Either can be used but a dedicated tripmeter such as a Terratrip, Brantz or Monit, to name just some of those available, will make your job a lot easier. You must have a known accurate means of measuring the distance the car has travelled and you can't assume that the odometer in the speedometer is even close. I've been caught out by going into a Touring Assembly (my first in many years) without checking the odometer which proved to read nearly 10% low even though the speed was displaying almost exactly correct.
Whichever you choose, you must take the time to calibrate it against either the North or South odometer checking locations set up for Classic Adelaide competitors (regrettably, the South Australian Government doesn't see a need to have standard surveyed five kilometre check zones marked out on major roads the way the other Governments throughout Australia have done). In the case of the vehicle odometer you may need to draw up a correction chart and convert the road book distances to the reading you expect to see on that odometer.
If you select a specialised tripmeter, get to know it's capabilities and limitations by reading the instructions, testing on casual road trips and talking to other users of the same unit. If possible fit the sensor on a non-driven wheel and consider the sensor an expendable component as it may either be damaged or you may decide to leave it with the car if you change drivers.
Map board
A good, safe board measuring 400 by 400mm. Use a piece of that plastic sign material that real estate agents love, it's light, reasonably rigid and won't take a chunk out of you if the driver really gets it wrong. Visit a 'two dollar' shop and pick up something with a plastic clip that can be pop rivetted to one edge with reinforcing washers on the back side. DON'T use bolts & nuts unless you are prepared to get button head screws and acorn nuts and then remove any excess screw projecting through. Above all, do NOT use wood or metal for the board as it, together with exposed or projecting screw thread, is a serious safety hazard.
Pencils
Several of these on hand are essential. Always use soft, dark lead 2B minimum and preferably 3B. If you opt to use 'normal' wooden pencils also include a good quality sharpener. If you prefer clutch type propelling pencils select ones with 0.9mm or larger lead as anything finer will be both much too fragile and inclined to dig holes in the paperwork before a dark enough mark is made.
Eraser
At least two of a good grade of the soft white plastic variety is best. I prefer to use only Staedler brand but if you are happy with another, stick with it. The eraser must lift the lead pencil marks cleanly without either smudging or fraying the surface of a map. You may be working on a copy of part of a map and the paper could be of a lower grade.
Highlighter pens
A few of these in varying light colours can be an advantage in pre-marking a map or for making important instructions stand out. Many people prefer to highlight certain features with fluorescent pens but it is better to have one or two sheets of clear acetate (overhead projection film) the full size of your map board, clip it on the board over the map and do the coloured marking on the acetate.
Avoid any colours such as blue that obscure the underlying information.
Rally romer
A small piece of plastic with map scales etc. printed round the edges. If you can find one with a compass rose embossed into it, snap it up as the compass rose will serve to remind you of which direction is which. When you use the matching scale for your map, place the correct numbered marks on the grid lines of the map and the corner of the romer shows the location the map reference relates to. This is an essential tool for quickly and accurately plotting of 6 and 8 figure map references. If your romer has a hole in it, loop a piece of string through it and hang it round your neck or attach it to an easy-to-reach part of the interior so you don't lose it under the seat.
Watch or other timepiece
A watch which shows seconds on the main display is necessary - this type costs very little from a 'two dollar' shop, but make sure it's reliable! You should have at least two time pieces in the car set to rally time, as a backup - set the driver's watch and/or car clock too.
A digital watch is probably best but I will admit that I have always used a Seiko Navigator 24 hour analog watch with a backup. If you opt for digital, ensure you have at least one analog watch in the car as sometimes 'clock' directions are used as part of a clue and without the analog watch it is more difficult to solve.
Ruler
A clean, clear acrylic 40cm long one with highly visible metric markings is the most basic tool you can use. Occasionally you will need this to resolve a location on the map, although this is apparently not something often used by Australian organisers.
Lighting
The importance of this cannot be overstated!
A small gooseneck map light with on/off switch positioned so that it can remain on while the car is moving without distracting reflections on the windshield or glare visible to the driver is your primary light source.
The car's interior lights are not suitable while driving as they are too bright but you can turn them on when stopped to solve a difficult clue.
A reasonable supplement to a traditional map light is a hand held fluorescent light - the advantage of this is that it gives off a more natural white light which makes it easier to distinguish lighter colours on the map. It can also be used as a work light for running repairs to the car!
All your lighting can be equipped with high intensity white LEDs which have the advantages of very directional clean white light and low power demand.
A switched bright white LED light mounted so that it illuminates a road card on a clip board when positioned on the car door with the window down is usually appreciated by control officials as it can save them time and effort (and being in favour with control officials is always a good thing).
Clear acetate film
Some smaller pieces of this together with a couple of good quality black permanent markers in the finest tip available will deal with 'map traces' and 'postage stamps' nicely. You can trace the image from the road book or instructions and then hunt for it on the map either true image or mirrored. Do NOT use non-permanent markers, they will smudge on acetate.
Clip boards
At least one and preferably two A4 size, one for the road card and another for the road book. Best if distinctly different colours, plastic covered with cardboard inner stiffening (i.e. the cheap Chinese type). A good alternative are the cheap translucent stiff plastic document wallets.
Other items that are often 'nice to have'
Poti
For the really tough ones (or once you have started using one), this is THE tool.
What is a 'poti' you ask?
Basically it is a low powered magnifying lens (3x is good) mounted in the top of a frame or housing with an internal light source in one or more sides/corners of the housing. The housing depth is set such that the focal point of the lens is exactly at the surface of any map or flat surface the 'poti' is stood on.
It might be round, square or rectangular, the shape is not particularly important although I have found a rectangular shape suits me best.
If you use a poti with a conventional bulb it's going to be a halogen bulb to be bright enough so you will need a power point for it. A cigarette lighter socket is the easiest and cheapest option although any plug and socket arrangement will be safer than patching into the car wiring.
Poti's are not particularly easy to find in Australia but are neither hard or expensive to fabricate now that large lenses are readily available from 'two dollar' shops. One of those, some suitably sized PVC pipe pieces, PVC plumbing adhesive, RTV silicone adhesive, a cheap bright LED compact torch and a few hours work will do the job.
Protractor
The normal basic school type is adequate for those odd occasions when you need to pass within a certain distance of a point. Make sure you keep the sharp point embedded in a plastic eraser when not in use to avoid stabbing yourself.
Drawing compass
Again a normal school type, preferably a full circle 360 degree type of reasonable size. Too small and it is nearly impossible to get specific angular deviation from a base line so the largest diameter you can reasonably stow is best.
Magnetic compass
An orienteering type, which can be anything from a cheap acrylic device through to an expensive piece of military hardware, to check whether the road the car is facing down really goes in the direction you think it does. Don't make the mistake of using it either inside or within a couple of metres of the car – steel car bodies mess up magnetic compasses.
Calculator
Not essential and could be replaced by an average speed card on most occasions but often handy for other purposes. Times like when the car has used three quarters of its fuel capacity and you need to calculate whether it can make the distance or maybe you are going to have to cut and run to pick up fuel and rejoin later. Or you need to work out where to rejoin after a cut and run in order to minimise points loss.
Spotlight
A high powered hand held to check that sign 50 metres away or to illuminate the work area when de-bogging the car. This should really be part of the car equipment but drivers have a habit of forgetting important stuff so organise it yourself.
Decoding wheel
This is often needed to deal with some of the weird clues provided by British (and particularly Scottish) organisers but with little recent experience in Australia I am unsure whether this is a necessity here.
If anyone knows of these types of clues being used, please provide examples so that this guide can be updated.
Adhesive tape
A small roll of good quality masking tape is sometimes useful for temporary retention of small items or holding down map covers.
The 'luxuries of life'
Mapping mileage wheel
Available from various electronics and motor sport outlets, these gadgets can be set for the scale of the map and by rolling the wheel along the mapped road the distance from and to any given points can be read directly. Sometimes useful for when a clue indicates that the next point is x km from one you have worked out but there could be a couple of solutions only differentiated by a small variance in distance.
Storage
You need somewhere to stow those tools and not just floating around in the car, stuffed in the glovebox or worst of all, in you pockets.
A decent quality flat bag like an oversized document case with three or four full size compartments and one or two smaller front pockets is ideal.
Management
The driver will undoubtedly think he/she is the most important person on board but that's a fallacy that you will have to deal with.
A good way to do this is to include the driver in at least some of the problem solving during the planning stage and keeping him/her involved anytime a decision is needed.
Making it their job to help spot clues, passage controls etc will also help.
Good teamwork is an essential part of a successful road rally or trials crew. Most people stay together as a team wherever possible and build up a rapport, so each knows almost instinctively what the other is thinking. A driver and navigator need to build up trust and confidence in each other's abilities to help them relax and perform at their best.
Tactics
A little lateral thinking can at times save you penalties, or cost your opponents more.
Here are some ideas but the sportsmanship of some is dubious at best!
Don't stop just after a control to solve a clue, tell the driver to carry on at a gentle pace to the next distinctive junction which you must describe sufficiently for him or her to recognise. You can then work on plotting the route which hopefully you will solve by the time you get to the junction, then provide the required directions and start reading the road. Driving on can save a lot of time.
If you can't figure it out, follow someone who looks like they know what they're doing. This can be dodgy because if they take the wrong way you may end up worse off than if you had just cut.
If you come into a control about to 'wrong direction' (WD) try sneaking past quietly in the hope that the officials are busy and don't spot you. Then, well out from the control (out of sight!) do a U-turn and proceed briskly to the control as if nothing unusual was happening. You just might get away with it and if not it will probably give the officials a laugh.
Not uncommonly, a number of cars will end up stopped at a junction trying to sort out the route. When one of them thinks they have it, the rest usually follow. If you are still working on it, consider whether the chance is worth trying, but do take notice of where the other cars go.
If you are first to plot the route and a competitor who is supposed to be ahead of you on time follows , drive on but time it so your arrival at the next control is just on time. They will be late and incur a penalty.
If you must let a competitor past who has been annoying you for some time by signalling with lights and/or horn, a good place to do so is just before the next observation control board, which you can carefully conceal by pulling over in front of it. If at night, either turn off your lights or make sure they don't illuminate the board.
If you are being followed by another car the driver will be able to use your brake lights to easily stay with you. The driver touching the brake pedal very lightly with his/her left foot when least expected is considered acceptable gamesmanship. A switch which disables the brake lights is neither acceptable nor legal.
If you are coming onto a suitable junction a good ploy to get rid of a team tagging along on your route plotting is to go just past the junction and then to let them past. Once they are out of sight, execute a smart U-turn and go back the correct way.
Timekeeping
Accurate and correct timing is probably the most difficult part of a road rally or trial as you follow a physical road route while staying on schedule and is the central feature which distinguishes both rallies and trials from other forms of motor sport.
When competing on a rally or trial, you need to always be aware of your time situation, so you know exactly what time to book into each time control. Your driver should also mentally keep track of Due Time and Lateness (see below) and be able to confirm the navigator's calculations.
If you see that you are going to arrive at a time control significantly before the correct time for your arrival, have the driver pull in to the side of the road before the control board and wait. Keep in mind any conditions laid down in the Supplementary Regulations such as penalties for stopping within sight of a control as it could prove an expensive mistake.
In principle, all the officials' watches (and yours) should be synchronised to the second with 'rally time' (Telstra time is the usual Australian standard), but sometimes they're not. If you don't think you have been booked in at the correct time, ask the official to note the difference between your time and his or hers on the road card. It is not worth complaining at the control but if a notation is on the road card the results may well be adjusted later. The overall event results are not often affected greatly by the odd time penalty with the possible exception of those few crews at the top in performance.
Basically, the idea of road rally timekeeping can be summarised like this:
- All timing is done in whole minutes, and times are rounded down, ignoring the "seconds" displayed on the clock, i.e. both 22:45:01 and 22:45:58 are considered as 22:45.
- Cars start one minute apart, according to car number, sometimes with the more experienced competitors having lower numbers and going off first but more usually in 'entry received' order.
- You try to book into the time controls in order, usually following a pre-defined schedule, set at some arbitrary average speed achievable in a standard road car driven in accordance with the road laws.
If you are running late, aim to stay running the same amount late, rather than racing to catch up. The organiser will often have provision in some form for detection of excess speed (and may even have the cooperation of the Police) so catching up lots of time is not an option!
Scheduled Time is the time you would book in at a given time control if not running late. Scheduled Time is predetermined by the organisers and it will be either printed on your time card or you will have to keep track of it as you go ( calculating it from the time you started and the number of minutes allowed for each section).
Due Time is the time you should try to book in at the next time control, in order to avoid being penalised. Note that this includes any previous Lateness you may have accumulated so if you were running 7 minutes late when you logged into the last control, and your original Scheduled Time at this control was 20:07, your Due Time at this control is 20:14.
Lateness is how far behind Scheduled Time you are running, expressed as a number of whole minutes, ie the difference between Due Time and Scheduled Time. If you arrive later than you should at a time control and log in after your Due Time, your Lateness increases.
Late Time Limit (LTL) is how much Lateness you are allowed to accumulate. This limit is usually 90 minutes but ask at the Drivers Briefing if it is not specified in the Supplementary Regulations. If you have more than the allowed Lateness, you are OTL (Outside Total Lateness). If you book into a time control so late that you're OTL, it is a 'missed control' as if you never visited it at all. To count as having finished the rally, you may be required to visit a minimum number of time controls, and there may be certain time controls which you must visit. More on this can be found in the 'National Rally Code' at par 3.9.
You should take the measures described below as necessary to avoid being OTL.
How to Avoid Becoming OTL
If your lateness has built up to more than 60% of the allowed maximum you need to consider taking measures to reduce it. How is a matter of judgement, since all of them cost you penalties and affect your score. Listed in order of how drastic the penalties, with the mildest first, are the options open to you but you must familiarise
yourself with the scoring system so you can decide which is least for the particular event you are engaged in.
Making Up Time
With a bit of practice, you will manage to do some rally sections in less than the specified amount of time. If you need to reduce your lateness, you may be able to book into a time control a ahead of your Due Time, instead of waiting outside. There may be significant penalties for early arrival and even harsher penalties if the average speed calculated from your elapsed time could not be achieved without excessive speed!
The next two options are collectively known as 'Cutting & Running' but the potential impact of each on your results is significantly different.
Cutting Some Route
If you are running late and you're not able to make up time by arriving early, you might consider missing out a bit of the route. If there are two time controls which are a short distance apart by road, but the rally route between them is quite contorted and much longer, you would be able to make up time by using the straightest route to the next time control. You risk missing passage controls and/or observation boards and arriving at the next control 'wrong direction'. Should you decide to do this it is wise to at least partly plot the correct route might be, so you can work out direction into the next control and make an educated guess at how many passage controls and/or observation boards you will miss. Usually, the organisers use the minimum passage controls and/or observation boards such that anyone who makes a navigational mistake misses at least one, but they are free to position them anywhere.
Cutting Controls
If you are really desperate, it is possible to skip one or more time controls and still have a chance of finishing the rally or trial. By going straight to a later control you can potentially pull back a large amount of time and make a fresh start, but you will be penalised for ALL the controls you missed so this is very much a last resort. In this case be sure to work out what time you need to book in at the control you have cut to as you don't want to arrive early (i.e. ahead of Scheduled Time).
It is very important to finish the rally, no matter how huge your penalties, since you don't know how badly everyone else might have done. You just might win an event after a performance you regard as poor because everyone else had an even more disastrous effort.
Paperwork
- Car registration papers, civil drivers licences, competition licences, log book (if the car has one), car scrutineering forms.
- Road cards, road books or instructions, 'get out of jail' envelopes, additional clue and instruction sheets handed out at controls.
- Medical intervention insurance documents – make sure the event insurance coverage is adequate for you and if in doubt arrange private cover.
- Supplementary Regulations and any amendments to these.
- Entry receipt (you will have arranged the entry rather than rely on a forgetful driver).
- Any maps or other items to purchase beforehand which are specified as required in the Supp Regs.
- Add more as you discover a need.
A document folder within your overall kit for some of them, one easy access pocket on the front of the bag dedicated to the road card and envelopes while you are not using them in a section or division.
Remember that some of these if missing will mean the end of the event so treat all documentation as precious.
Route plotting and clue solving
Information provided in this section as not a definitive text on the type of clues and/or instructions you will encounter. Each type of clue potentially has variations, some of which are mentioned herein but any director is capable of developing a new, devious and confusing way of using an older clue type.
It is up to the navigator, together with the driver, to determine what the particular director means in any given situation but this is not impossible if logic and methodic working practices are applied.
A number of clubs conduct navigation instruction sessions, usually in the evening, which a prospective or beginning navigator would find very beneficial.
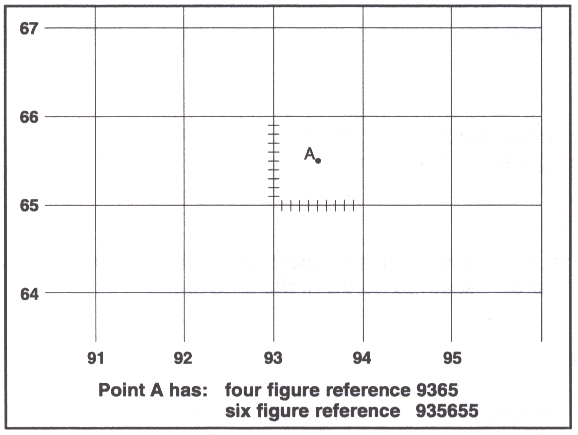
Map references
Two systems of map references predominate in navigation, those being the Geographic Coordinates and the Universal Transverse Mercator (UTM) Grid of which the Australian Map Grid (AMG) is a part.
On all standard maps produced in accordance with the AMG there is a grid composed of two sets of equally spaced parallel lines which intersect at right angles. The distance represented between the grid lines is dependent on the map scale with all maps from 1:25,000 to and including 1:100,000 having intervals of 1,000m and 1:250,000 having intervals of 10,000m.
Eastings
The vertical grid lines (those running North/South) are called Eastings. The lines of easting are numbered from left to right (west to east).
Northings
The horizontal grid lines (those running East/West) are called Northngs. The lines of northing are numbered from bottom to top (south to north).
Grid references
Grid references are a combination of an easting and a northing, always in that order and concatenated to create one number like 935655, or more correctly GR935655. Such a grid reference denotes the bottom left hand corner of a square, the length of the side being dependent on the size of the grid reference. Any easting and northing grid reference is a reference to an area, not a point.
| Size of reference | Length of side |
| Four figure reference | 1000m |
| Six figure reference | 100m |
| Eight figure reference | 10m |
| Ten figure reference | 1m |
If an easting and northing coordinate is given then be aware that the true location intended by the event director could be anywhere within the area defined in the above table.
In contrast, a Geographic Coordinate refers to a point and no ambiguity is acceptable.
Other maps, often older and frequently with obscure or out dated scales, are sometimes supplied by the event director. These may show road alignments that no longer exist or have changed beyond recognition or bear markings indicating physical features like buildings that are nothing more than a memory, any of which may have been used by the director in the clues or instructions.
Road Junctions
This clue type is usually easy to identify and solve as it simply comprises a list of junctions and the direction to take at that junction.
XRSO SRSO SRSO SRSO SRSO TJTR SRSO XRTR TJTR
SRSO SRSO SRSO SRSO SRSO SRSO XRTR SRSO SRTL
Tulips
If the junction on the map is shaped as below, going straight on from A to B you would leave a road on the right. However also turning from C to A or from B to C you would leave a road on the right.
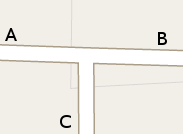
For each of these three cases the junction in the roadbook will look the same in it's simplest form.

Similarly, to leave a road on the left you could be going straight on from B to A, taking a right from A to C, or turning right at the T-junction from C to B.
These three cases will all be a mirror image of the above illustration.

The event director might be nice to competitors and draw the tulips to a reasonably accurate depiction of the road as shown on the map with entry and exit roads at close to the correct angles but many don't do so.
Strip charts, herringbones,'chicken scratchings' or 'straight lines'
A strip chart, herringbone or chicken scratching is created by following the route itself and pulling it out straight, all the other roads being snipped off leaving short tails, as below, where the start is indicated by the ball.
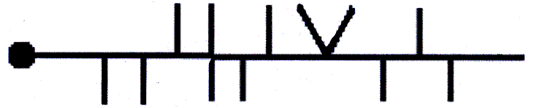
Note:
- The fourth intersection which is presumably but not necessarily a crossroads, it simply indicates that you will pass through a junction at which you will leave a road to both your left and your right.
- The seventh intersection which again is presumably but not necessarily a crossroads, it simply indicates that you will pass through a junction at which you will leave two roads to your left.
Be aware that the:
- Strip chart may or may not include all junctions between the start and end points
- Start ball may be missing
- Strip chart may read from finish to start if the start ball is missing
- Director might even make it a circular strip chart with no defined start or end points.
Pass throughs
These will be a series of 4 digit 'eastings & northings' denoting a sequence of grid squares through which the road will pass in the shortest distance. The grid squares may or may not be adjoing.
Avoids
The opposite of pass throughs.
Grid lines
A series of two digit numbers indicating which easting or northing grid line to pass through in sequence. Usually easy to detect by comparing the first two with your current known plotted position.
Grid squares
The same basic clue as the grid line in a different format. A series of four digit numbers indicating which grid squares to pass through in sequence. Like grid lines, usually easy to detect.
Postage stamps
Each 'stamp' represents a grid square and the markings on the edges represent where the road traverses the grid line. Time controls may be indicated by dots within the 'stamp'.
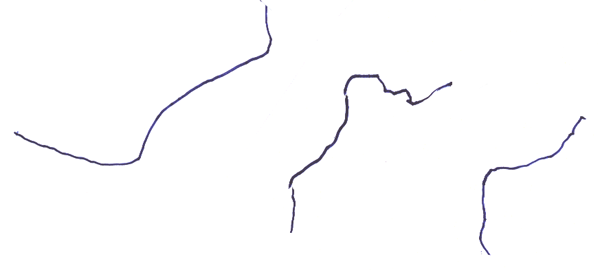
Road tracings
Each piece is a tracing of a road portion and should be to the correct scale. Tracing onto acetate will assist but getting the pieces in order and on the right road can be challenging.
Compass directions
These give the direction to leave the junction.
ENE SSE NE E WNW NE
Clock times
You enter the junction along the direction of the hour hand and leave in the direction pointed to by the minute hand.
8:05 7:55 6:15 8:25 6:20 9.05
Others
There may be reference to buildings either real or demolished or anything else for the director to dream up.
Road reading
There are more than one aspect of reading the road.
In the most basic form, you will learn to determine whether a road looks 'wrong' in time. Obviously if it's a tarmac event and you suddenly find that the turnoff you have decided is the route takes you onto a gravel road then you've very likely got it wrong.
A more advanced form of 'reading the road' should really be termed 'reading the map'. This is the skill of predicting the corners ahead and general topography from looking at the map. You should be giving your driver a combined stream of information together with any relevant directions from the road book assist with progress.
You must make your driver understand that total reliance cannot be placed on the information offered about the severity of corners, etc. but should only use it to help with their own recognition of the hazards ahead. Good road reading aids concentration for both crew members, making you both more competitive, and makes the rally more enjoyable.
Your driver should go just slow enough so that if you stuff up a call totally, or an unexpected hazard (like a kangaroo) is encountered, there may be a nervous moment but nothing more. You do not have to be exact with your calls but you do need to call clearly and in good time before your driver needs to be taking action to negotiate the feature.
As part of the crew, you need to agree on a systematic manner of calling the map reading, and practice it, so that both members know precisely what is meant at all times. Don't develop a complex system as that will quickly take the enjoyment out of the sport. A good rule to maintain is that no word should have more than one meaning or be used in two different contexts.
Something like this:
Corners
- fifteen
- thirty
- forty-five
- sixty
- seventy-five
- ninety (a right angle)
- tighter than ninety (up to 120 degrees)
- hairpin (anything over 120 degrees)
each followed by either left or right as appropriate.
Enhancement to this may be:
- 'sharp' where the map detail is a sharp, distinct angle. Most likely a tight and possibly blind bend in the road.
- (nothing) for an average corner where you can see a small radius on the map.
- 'medium' where you can see a more generous curve on the map.
- 'open' or 'long' where there is a long, smooth sweeping curve on the map.
Junctions
- describe the shape as your driver will see it
- if approaching on the 'leg' remind your driver to give way
- if it appears that you will be entering major roads from a minor 'arm' warn your driver that a 'give way' is likely
- side road
- T-junction
- crossroads
- fork
each followed by turn left, turn right or straight on as appropriate
Enhancement to these should be 'give way'
Straight roads
Just before the estimated braking point for a corner, call (or repeat) the corner and describe the following straight or corner.
As the car takes the corner, repeat the straight that follows it, and call the next corner as well.
Estimate the length of the straight using the map grid as a guide.
Use multiples of 100m for distance, possibly with the addition of 'plus' if your driver likes to know that it is more like 150m.
If it is 100m or less between two corners or junctions, call them both together separated by the word "into".
On longer straights of 400m or more, repeat the corner or junction as you come to your estimate of the braking distance for it.
On very long straights, compare features on the map with what you can see to help you estimate the distance to the next junction or corner, and provide a countdown - "five hundred ... four hundred ...". The countdown together with your estimation of the severity of the corner will help your driver to judge when to start braking.
If you're not quite sure of the distance, use 'ish' ie. 200 ish.
Features
Call any features off the map which may represent hazards. The principal ones are:
'bridge' where marked on the map, whether the road goes under or over them. The road is may be narrower at this point, and any bends immediately before or after the bridge may be tighter than shown on the map. Call the bends before and after the bridge as one descriptive stream of information, e.g. "75 left under bridge into 60 right all tight"
'possible bridge' where a stream passes under the road without a bridge being marked as there may be a severe hump in the road.
'ford' if water may pass over the road. There are often road signs to confirm a ford ahead but rarely any indication of the severity of the drop (or the water depth if it's been raining upstream).
'steep hill' where you can see a dramatic closure in the gaps between contour lines (if present). Don't try to guess whether it's an incline or decline, let your driver decide.
'gate' where the the map features indicate that you are proceeding into or across a paddock or similar. With luck it will be a cattle grid or there might not even be a gate anymore but your driver is going to get very excited if you don't call the warning and he or she hits a solid four rail farm gate at speed.
Call other features that you can see ahead or read off the map which will help the driver pick out corners, junctions and other significant information e.g. "75 left past that big gum tree caution gate".
As you gain confidence and experience, it's worth calling road topography from the contour lines, e.g. a sudden closure of the contour lines in the middle of a straight road may be associated with either a sharp crest or a deep depression and could present a serious danger if encountered at speed.
Use short distinct words in your instructions and information stream but if you are not certain about the map detail warn your driver by providing as full a description as you can. In time he or she will automatically recognise that fuller descriptive information flow as a warning.
When reading the road, don't stare at the map, but continually look up and glance out of the car. This helps you confirm your place on the map and keeps you from becoming car sick.
These are very different skills to the 'reading the road' that the driver must develop.
Giving directions
All instructions need to be given with a clear voice, a calm manner and without excessive or unnecessary words.
If you find yourself getting flustered or uptight, tell the driver to stop and then take time out to get on top of what is bothering you.
What to do if the driver doesn't stop? Take a few deep breaths and then advise him/her that there will be no further instructions from you until such time as the situation is resolved. If that doesn't get his/her attention then go silent, pack away your gear, think about who you would be better off sitting beside and start planning for a change of driver and car before the next event.
Keeping your place on the map and in the road book
This is absolutely vital!
If you have any doubt about having done so, even a niggling doubt about just where you and the car are, tell the driver to stop immediately. The two of you can then go over the progress to that point and try to resolve the issue. It's nearly always better to lose a few minutes this way than find an 'out-of-bounds' board or similar in front of you and then have to backtrack twenty minutes or more to get to a point that you are sure of (a loss of at least 40 minutes!).
Other event types
There are variations to these events such as those run by the South East Automobile Club (SEAC) which have some significant differences.
SEAC run events on closed forestry roads which could be regarded as a hybrid between a navigational road event and a special stage event. That makes them a 'trial' and the events are rather unique and apparently a heap of fun.
There is an allowance of 60 minutes mapping time and you can check your own maps with the event ones prior to starting. With 1000's of pine breaks, that mostly look the same, getting lost is not a particularly good option. There are far more roads in pine forests than you would ever find on an average topographic map used on the road rallies or trials, so the navigator MUST know exactly where they are ALL of the time.
All SEAC trials are timed to the second. Cars leave two minutes apart, sometimes three if there is a dust issue. Start positions are all drawn by a ballot, A graders first then B grade.
All of the maps used are photocopied forestry plan maps which don't give a lot of information, so drivers and navigators are always on their toes. There are no contour lines and maps can be inaccurate given that the roads are being updated all the time but Directors do their best to eliminate map errors.